sharemypost Documentation
Everything you need to install, configure, and get the most out of sharemypost — the powerful social sharing plugin for WordPress.
Getting Started
Dashboard
Inline Content
Configure share buttons that appear within your post content — above, below, or both.
Floating Bar
Set up a sticky share bar fixed on the left or right side of your pages.
Custom Networks
Create your own social networks with custom images, colors, and share URLs.
Click to X/Twitter
Insert stylable "Click to Tweet" boxes with the shortcode system.
Style Customization
Customize button appearance with basic and advanced styling options.
Google Analytics Integration
Easily track your social sharing performance by connecting your Google Analytics 4 (GA4) property to sharemypost.
Getting Started with sharemypost
Welcome to sharemypost! This guide will walk you through everything you need to know to get up and running with the most powerful social sharing plugin for WordPress.
What is sharemypost?
sharemypost is a lightweight WordPress plugin that adds social sharing buttons to your content. It supports 30+ social networks with floating share bars and inline buttons.
Key Concepts
- Floating Bar — A fixed-position share bar on the left or right side that stays visible as users scroll
- Inline Buttons — Share buttons embedded above, below, or on both sides of post content
Installation
Installing ShareMyPost is quick and easy, just like installing any other WordPress plugin. Whether you're using the free version from the WordPress Plugin Directory or the Pro version, you can have beautiful social sharing buttons up and running on your website in just a few clicks.
Installing the Free Version
You can install ShareMyPost Free directly from your WordPress dashboard:
1. Log in to your WordPress admin dashboard.
2. Go to Plugins → Add New.
3. In the search bar, type "ShareMyPost".
4. Click Install Now next to the ShareMyPost plugin.
5. Once the installation is complete, click Activate Plugin.
Installing the Pro Version
To install ShareMyPost Pro, follow these steps:
1. Download the sharemypost-pro.zip file from your account dashboard.
2. Log in to your WordPress admin dashboard.
3. Go to Plugins → Add New.
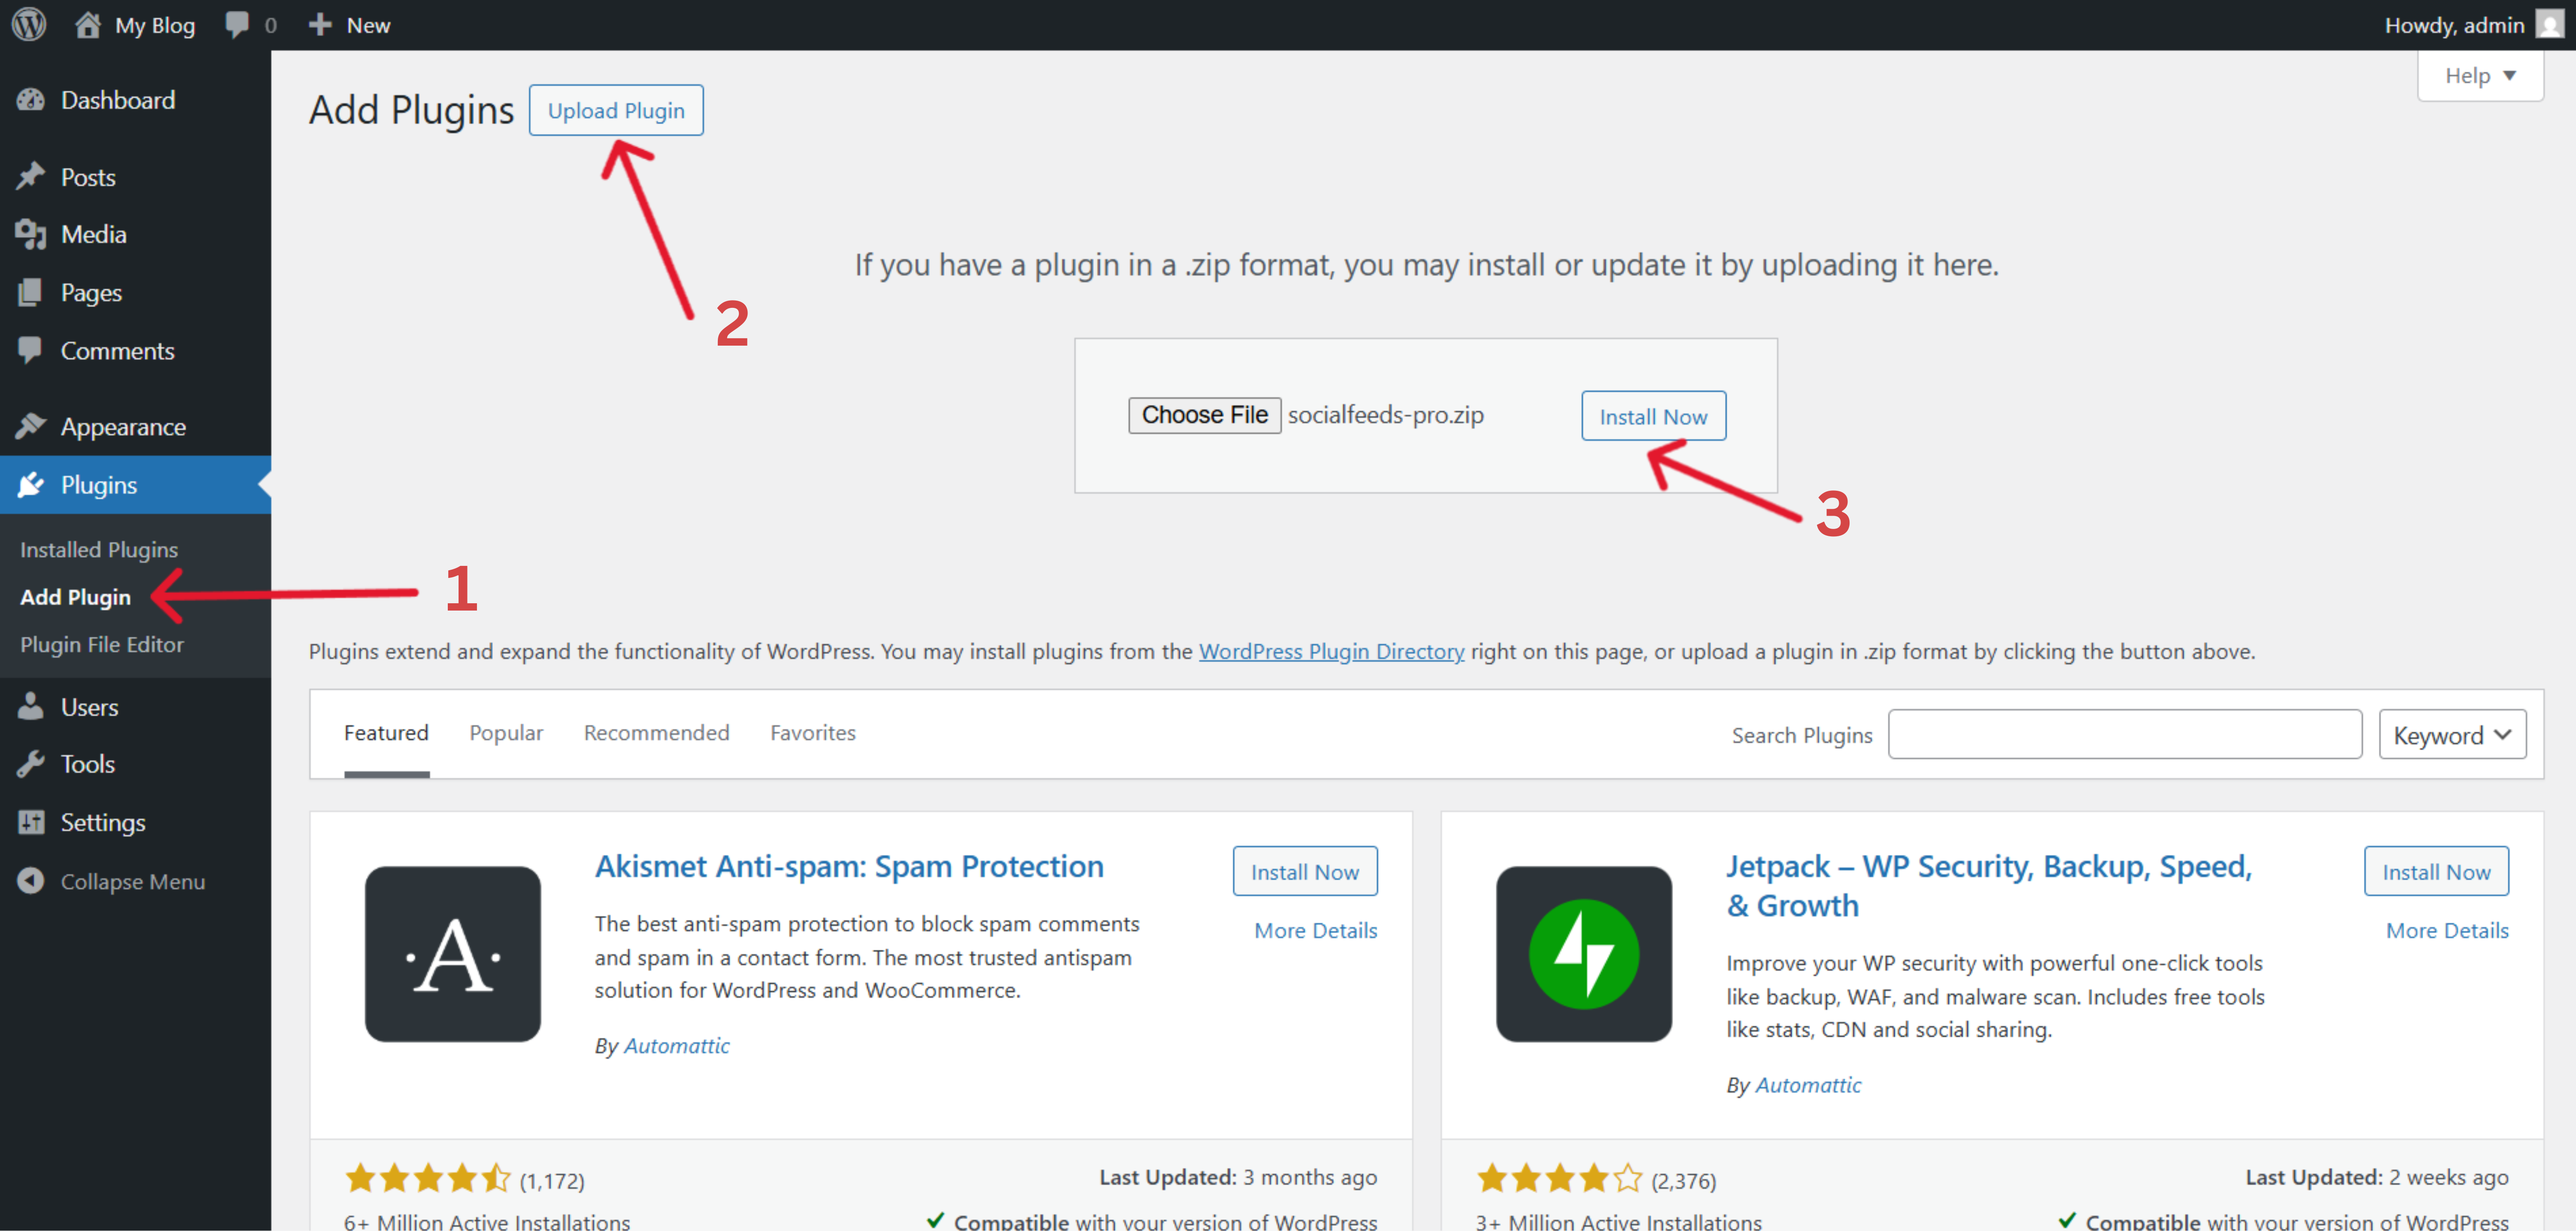
4. Click the Upload Plugin button at the top.
5. Click Choose File and select the downloaded sharemypost-pro.zip file.
6. Click Install Now, then click Activate Plugin.
System Requirements
WordPress: Version 6.0 or higher (tested up to the latest version).
PHP: Version 7.4 or higher (recommended).
Browser: A modern web browser with JavaScript enabled.
Next Steps
After activating ShareMyPost, you'll see the ShareMyPost menu in your WordPress admin sidebar.
Click ShareMyPost to open the dashboard, configure your social sharing settings, choose your preferred networks, and customize how share buttons appear on your website.
How to Buy ShareMyPost Pro
In this guide we will help you buy ShareMyPost Pro. ShareMyPost Pro can be purchased through Softaculous. To do this, log in to the Softaculous client area.
Login To Your Softaculous Account
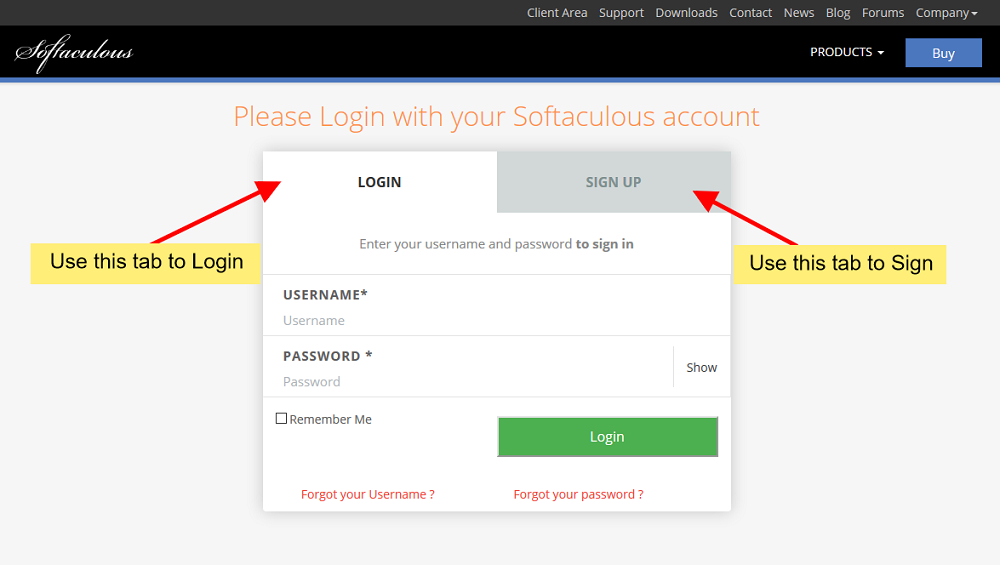
You will need a Softaculous account to purchase the license.
- If you do not have a Softaculous account, create one by clicking the Sign Up tab on the client center login page.
- If you already have a Softaculous account, simply log in to the client center.
Place Order
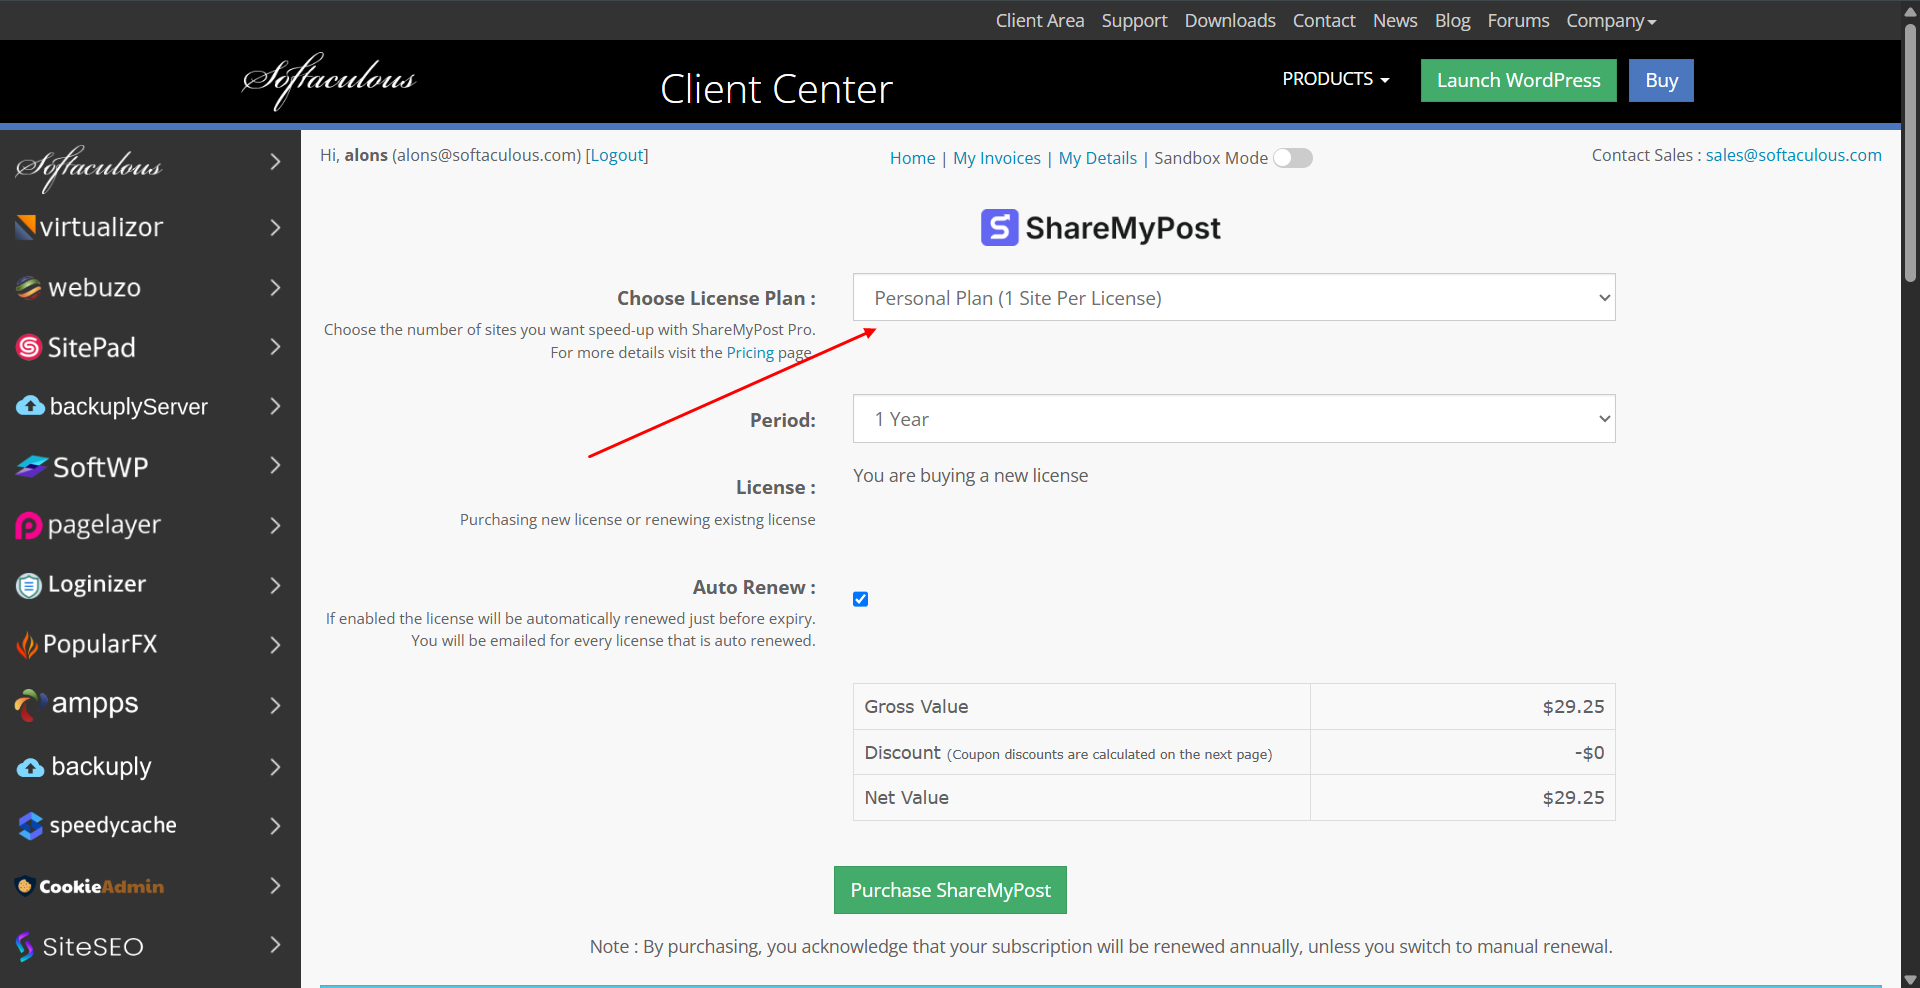
Once you have logged in, from the left menu click on ShareMyPost → Purchase ShareMyPost.
- Choose a license plan: we offer various plans to suit your needs. See our pricing page for details.
- Click the Purchase ShareMyPost button at the bottom of the form.
- On the payment page, select your desired payment option and click Proceed to payment.
- You will be redirected to the payment gateway to complete the transaction.
If you face any issues, contact our support team at [email protected].
How to Install ShareMyPost Pro
- This guide shows you how to install the Pro version of ShareMyPost.
- We assume you have already purchased ShareMyPost Pro and have a license key. If not, see the How to Buy guide.
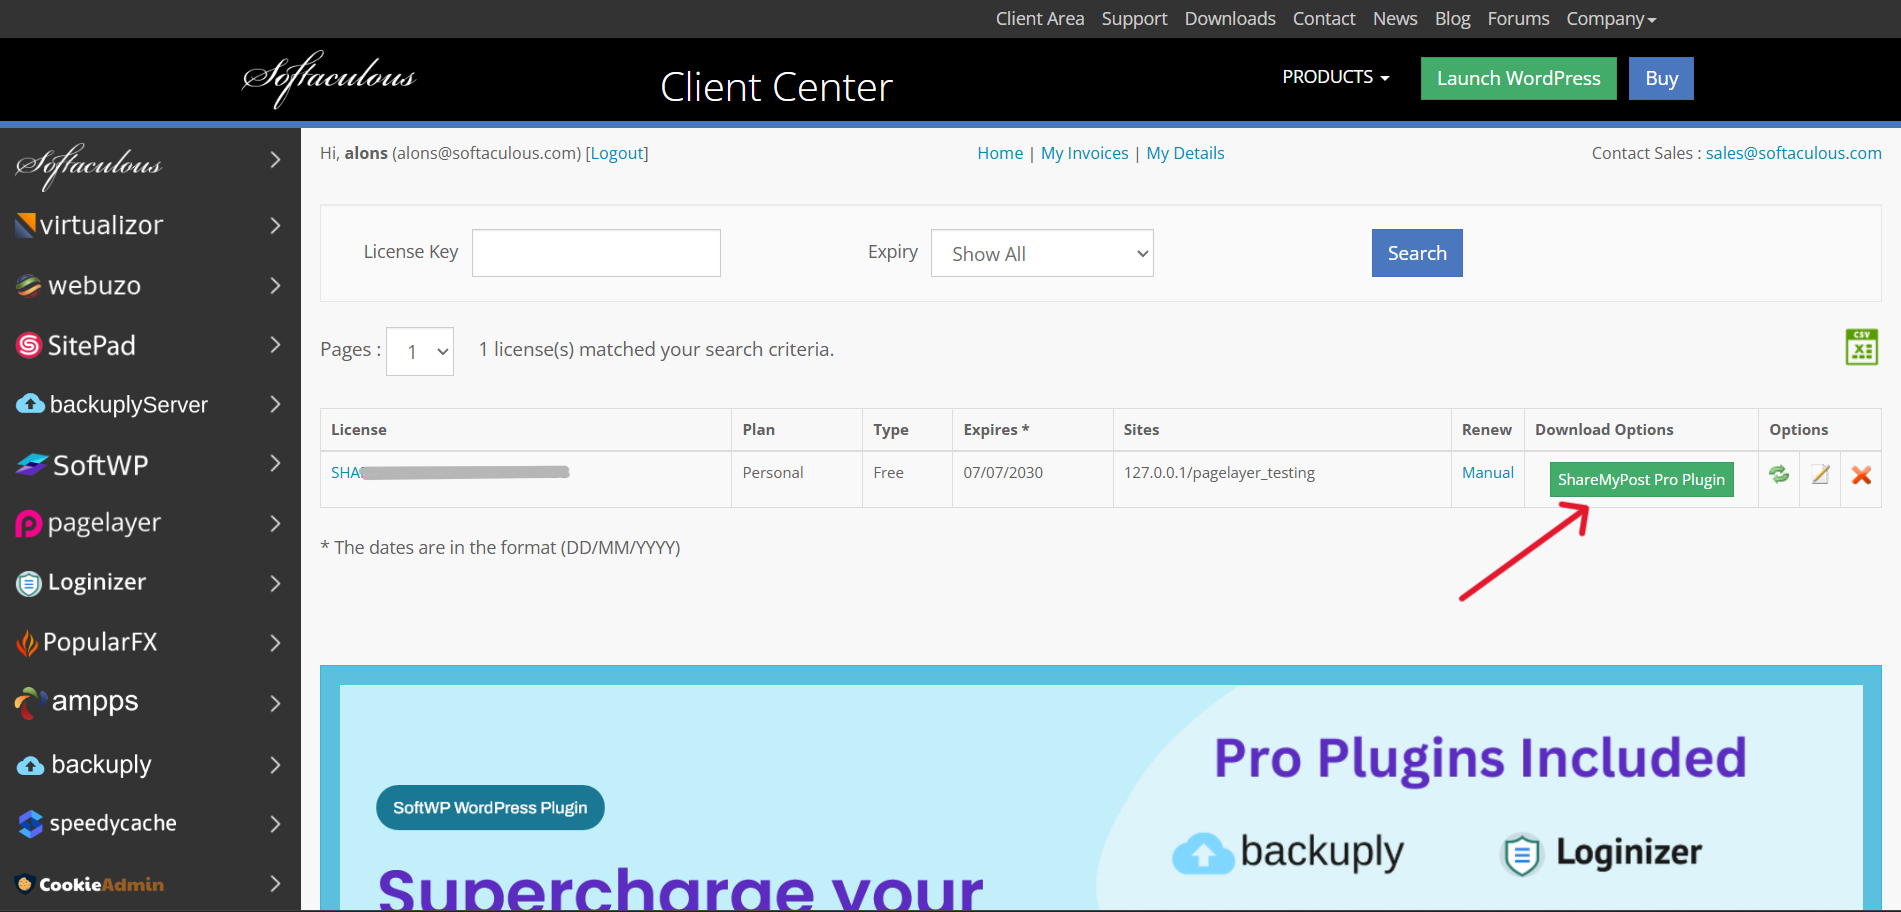
- The ShareMyPost Pro plugin is available for download from your client area after purchase.
- The following is a screenshot of the client area showing the download link:
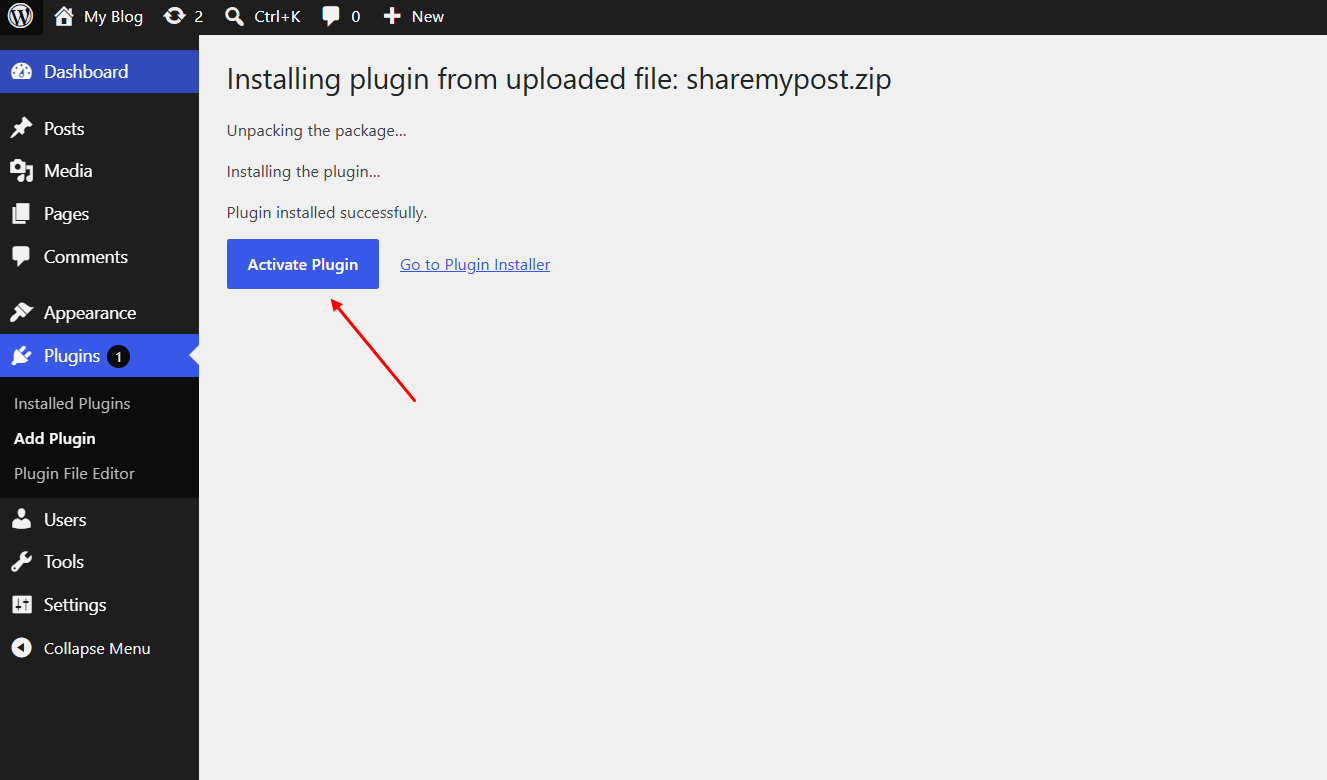
- After downloading the plugin zip file, go to WordPress admin → Plugins → Add New → Upload Plugin.
- An upload field will appear. Select the plugin file and click Install Now.
- After the install completes, activate the plugin. Next, link your license with the plugin to receive updates.
Linking License with the Plugin
- After installation, link the license with the plugin to receive updates.
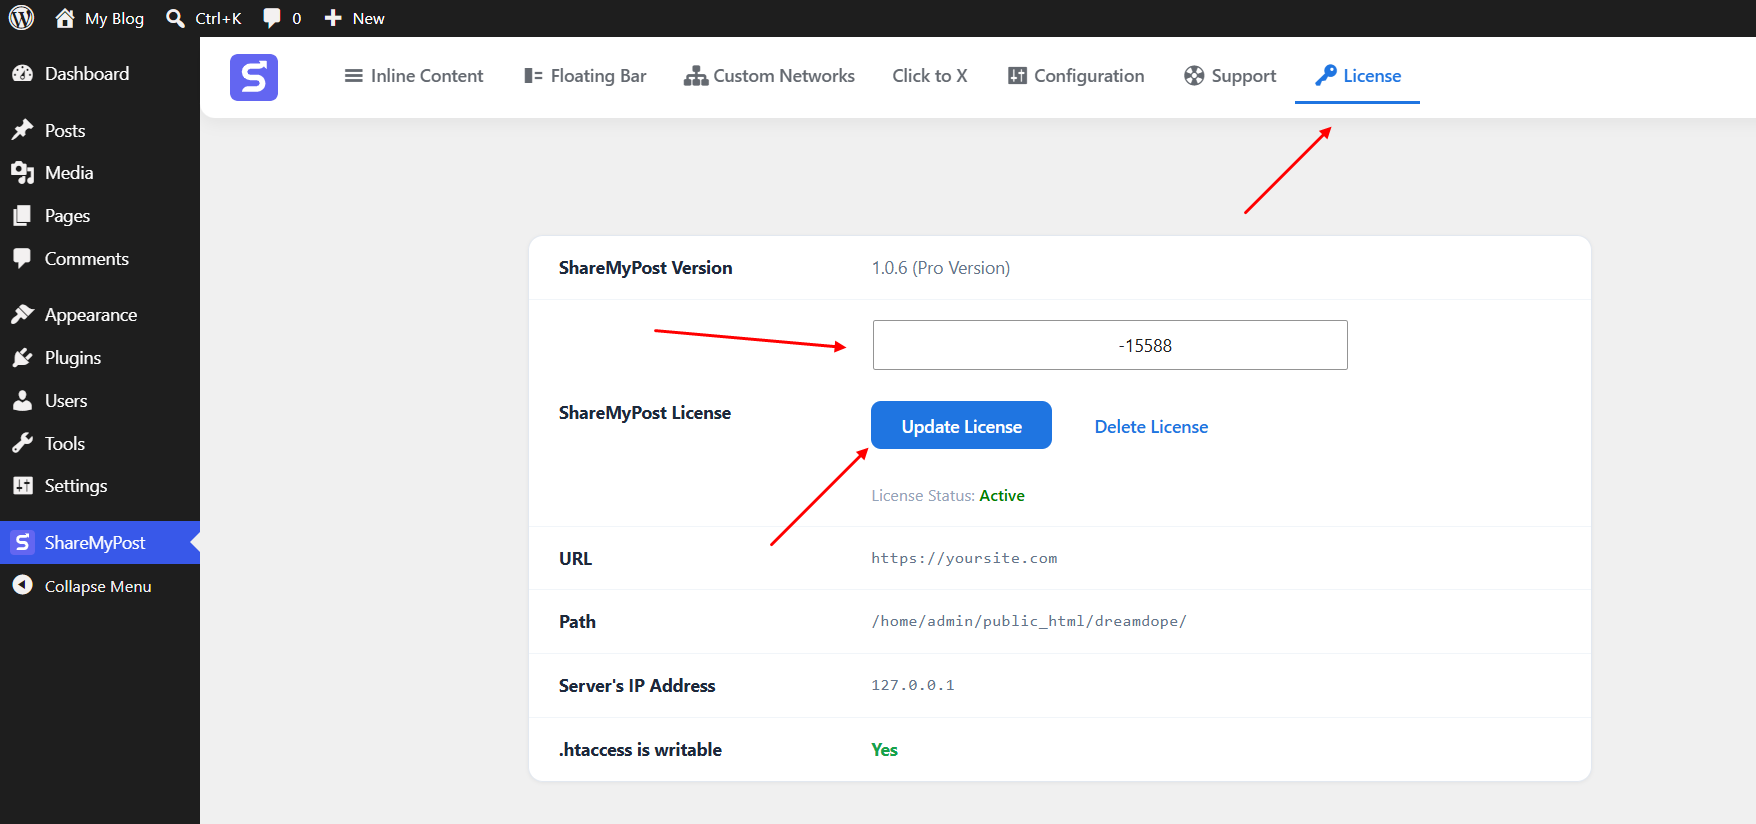
- In your WordPress admin, go to ShareMyPost → License.
- On the License page, enter your license key in the License field and click Update License Settings.
- After saving, click Activate to activate your license key.
If you face any issues in any step, reach out to our support team at [email protected].
Inline Content Settings
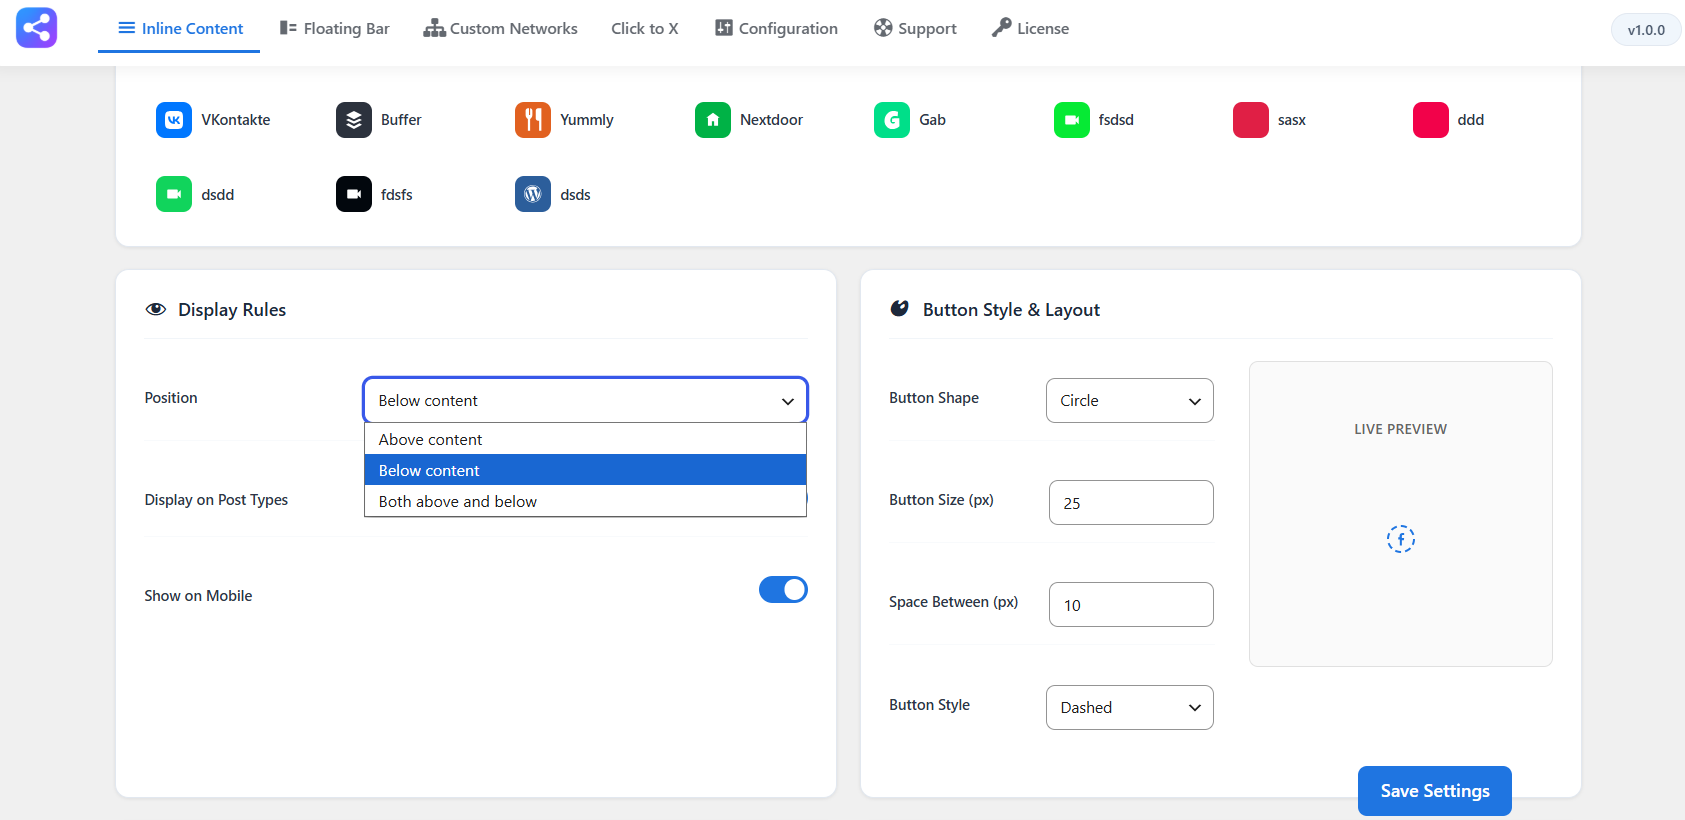
The Inline Content tab controls share buttons that appear within your post content — above, below, or on both sides. Access it from Inline Content.
Enable / Disable
Toggle Inline Content on or off to show or hide share buttons inside your posts. All other settings on this tab are ignored when disabled. Default: On.
Display Rules
- Position — Choose where buttons appear relative to your content: Above Content, Below Content (default), or Both (above and below).
- Display on Post Types — Select which post types (Posts, Pages, Custom Post Types) show inline buttons. Each type is a pill-style toggle. Default: Posts.
- Show on Mobile — Toggle to show or hide the inline bar on mobile devices. Default: On.
Button Style & Layout Pro
- Button Shape — Choose from Square, Rounded, pill, Circle, or Drop.
- Button Size (px) — Set button dimensions from 6 to 120 pixels. Default: 38px.
- Space Between (px) — Gap between adjacent buttons from 0 to 60 pixels. Default: 10px.
- Button Style — Pick a visual style: Filled (solid background, default), Outline (border only), or Minimal (icon only, no background).
- Live Preview — Instantly see a sample button update in real time as your selected shape, size, style, and spacing settings are applied.
Extras Pro
- Universal Share Button — Adds a "+" button that opens a modal with all available networks. Default: On.
- Universal Button Color — Hex color picker for the universal button.
Network Selection
Choose which social networks appear in the inline bar. Each network is shown as a toggle tile with its icon and name — click to enable or disable. Drag and drop tiles to reorder (Pro). Default: Facebook, Twitter/X, WhatsApp, LinkedIn.
Button Appearance
- Show Labels — Display mode: Icon Only (default), Label Only, or Icon + Label.
- Button Colors — Use Original brand colors (default) or select a Custom Color to apply uniformly across all networks.
- Custom Color — Hex color picker shown when Custom Color is selected.
Floating Bar Settings
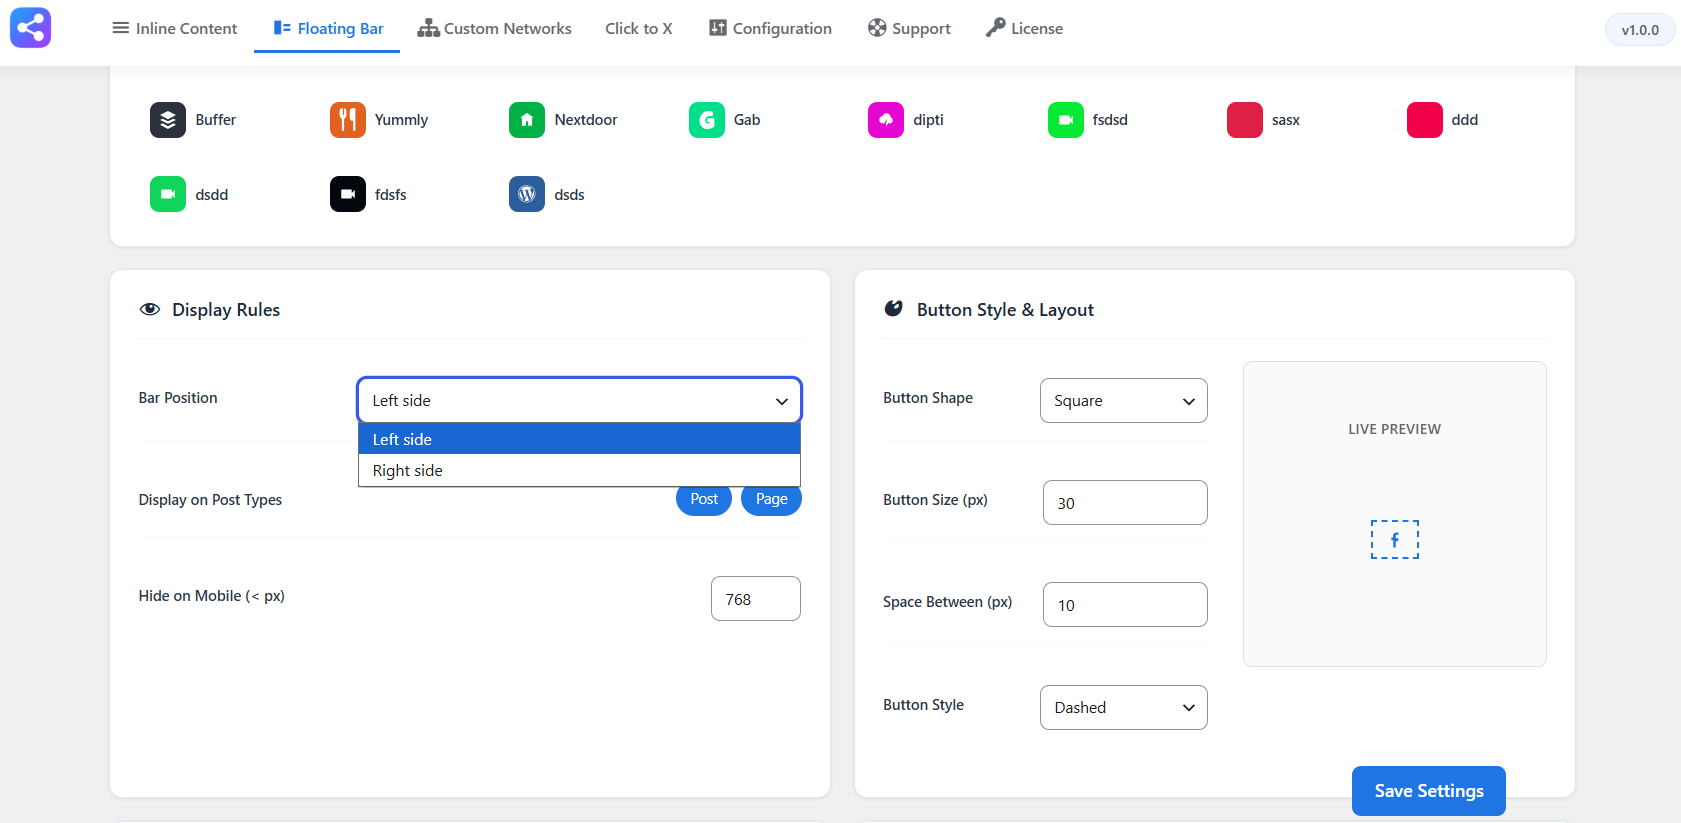
The Floating Bar tab controls the sticky share bar that stays fixed on the left or right side of your pages. Access it from Floating Bar.
Enable / Disable
Toggle Floating Bar on or off to show or hide the sticky side bar on your pages. All other settings on this tab are ignored when disabled. Default: On.
Display Rules
- Bar Position — Attach the bar to the Left side or Right side (default) of the viewport.
- Display on Post Types — Select which post types show the floating bar. Each type is a pill-style toggle.
- Hide on Mobile (< px) — Enter a breakpoint width. The bar is hidden when the viewport is narrower than this value.
Button Style & Layout Pro
- Button Shape — Square, Rounded, pill, Circle, or Drop.
- Button Size (px) — Button dimensions from 6 to 120 pixels.
- Space Between (px) — Gap between buttons from 0 to 60 pixels.
- Button Style — Filled (solid background, default), Outline (border only), or Minimal (icon only, no background).
- Live Preview — A real-time preview renders a sample button with your chosen shape, size, style, and spacing.
Extras Pro
- Universal Share Button — Adds a "+" button that opens a modal with all available networks.
- Universal Button Color — Hex color picker.
Network Selection
Choose which social networks appear in the floating bar. Toggle network tiles on or off. Drag and drop to reorder (Pro). Default: Facebook, Twitter/X, WhatsApp, LinkedIn.
Button Appearance
- Show Labels — Icon Only (default), Label Only, or Icon + Label.
- Button Colors — Original brand colors (default) or a uniform Custom Color.
- Custom Color — Hex color picker. Visible when Custom Color is selected.
Custom Networks
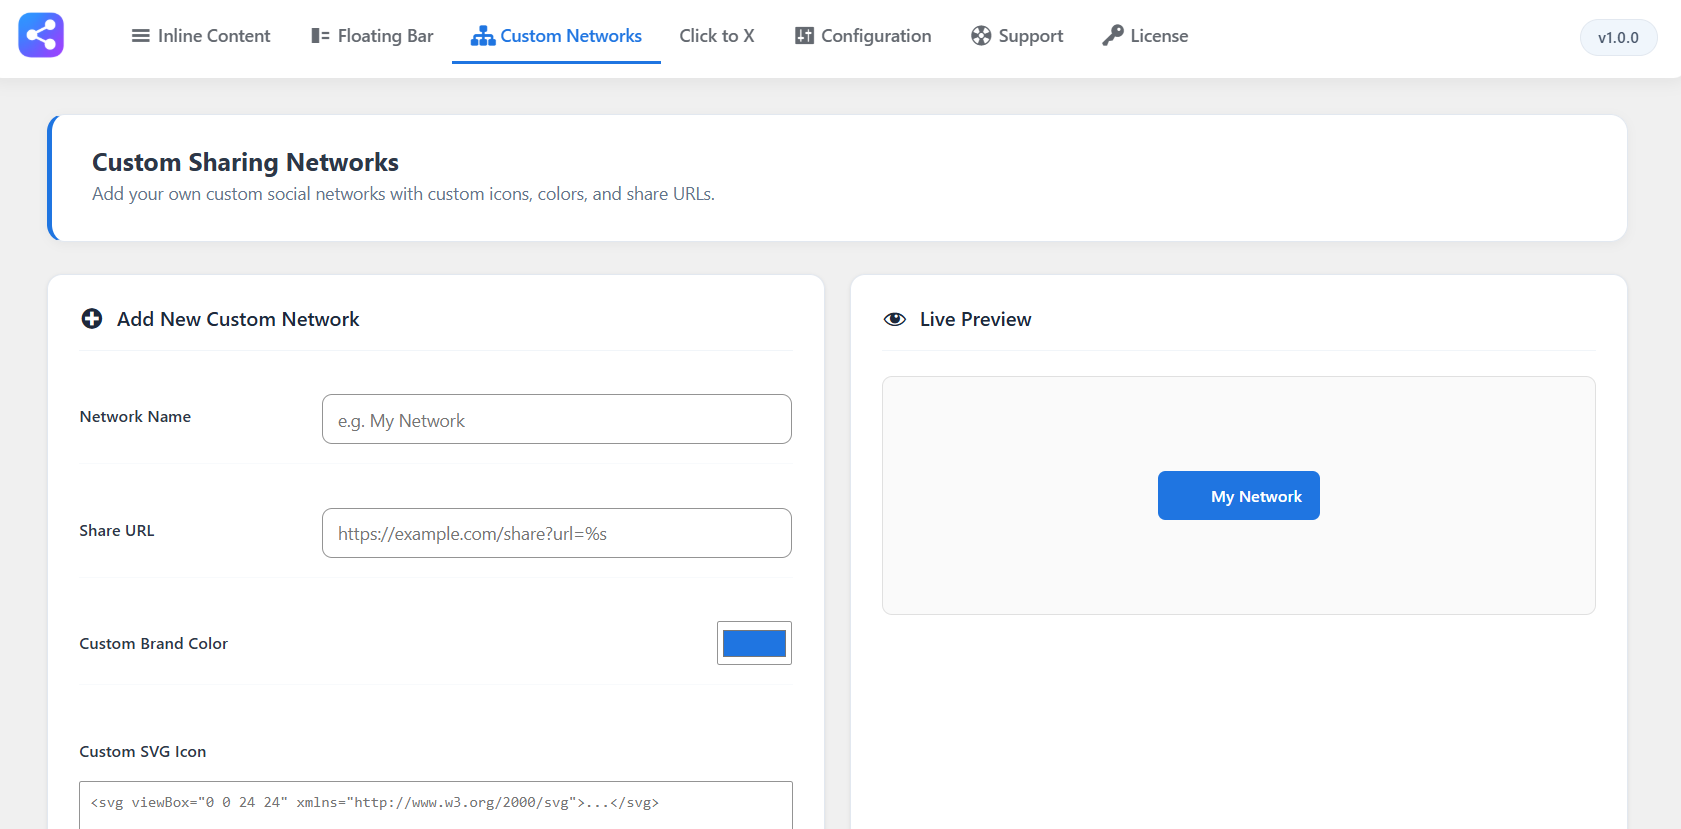
sharemypost Pro lets you create your own custom social networks with custom images, labels, colors, and share URLs. Perfect for adding niche platforms or internal sharing tools.
Creating a Custom Network
Navigate to sharemypost → Settings → Custom Networks tab. Click Add New Custom Network and fill in the fields:
- Network Name — Display name for your network (e.g. "My Network")
- Share URL — URL template. Use
%sas placeholder for the page URL. Use%title%for the post title. - Custom Brand Color — Brand color picker (hex format)
- Custom SVG Icon — Paste your SVG markup for the network icon
After saving, the custom network appears alongside built-in networks in your share bars. It uses its defined color across all button styles (filled, outline, minimal).
Managing Custom Networks
- Edit — Click the pencil icon on any saved network to populate the form for editing
- Delete — Click the trash icon to remove a custom network (with confirmation)
- Reorder — Drag and drop network tiles to change their display order
- Save / Cancel — Save Network submits without page reload; Cancel resets the form
Click to X/Twitter Settings Pro
Click to X/Twitter lets you insert stylable "Click to Tweet" boxes into your posts and pages. When a reader clicks the button, a pre-populated X/Twitter share intent opens with your specified text. Access it from Click to X/Twitter.
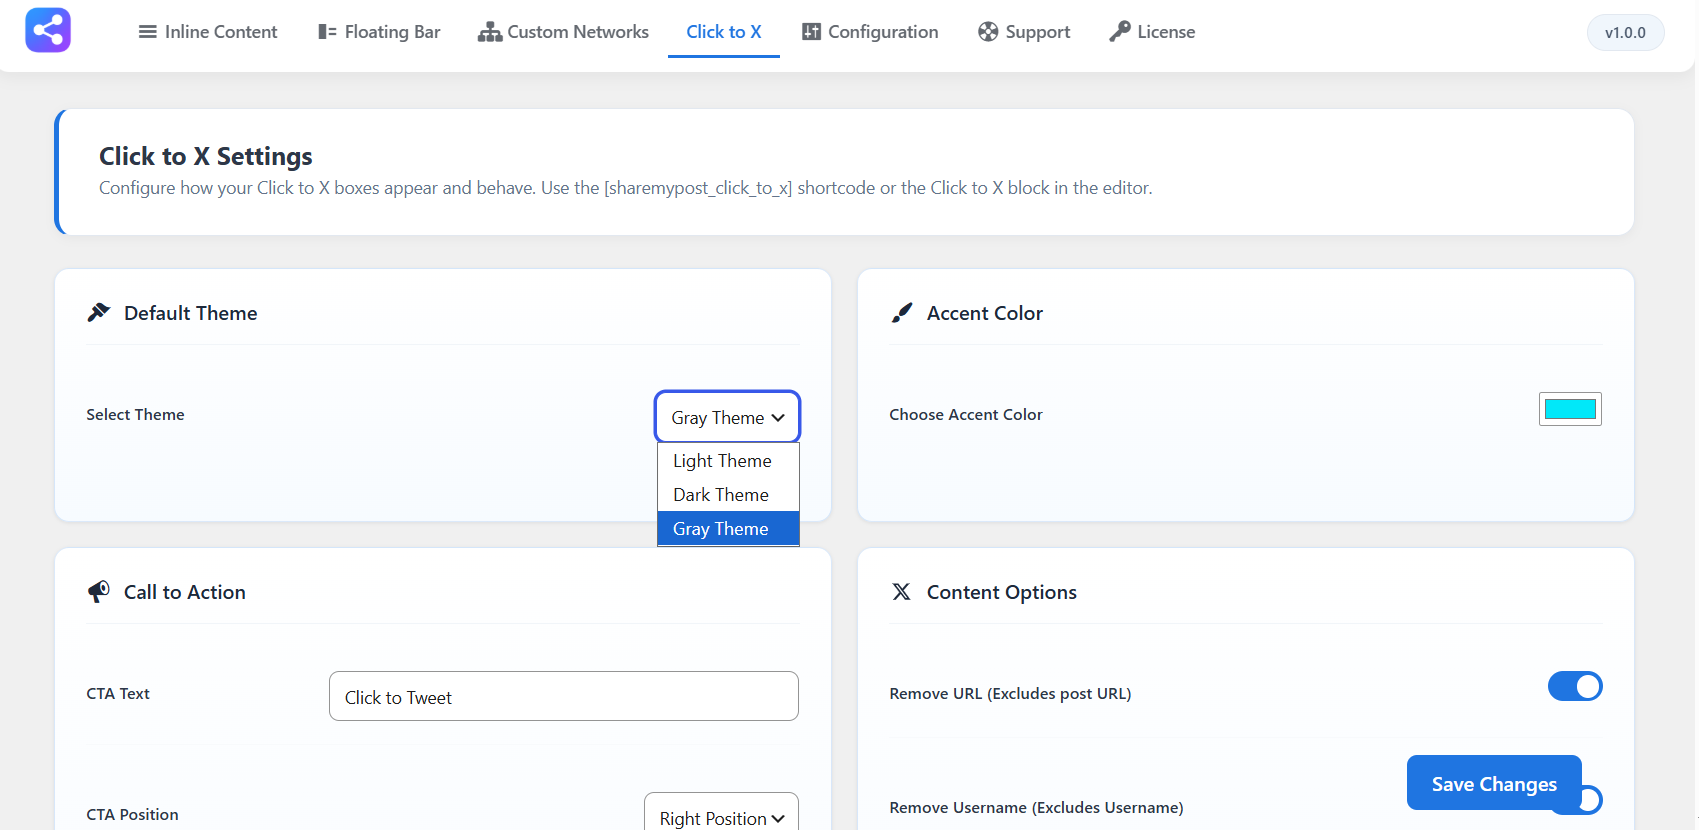
Insert a Click to X/Twitter box via the [sharemypost_click_to_tweet] shortcode.
Default Theme
Select Theme — Choose the visual style for your Click to X/Twitter boxes: Light (default), Dark, or Gray.
Accent Color
Choose Accent Color — Pick a hex color for button and link highlights.
Call to Action
- CTA Text — The button label text. Default: "Click to Tweet".
- CTA Position — Whether the CTA button appears on the Right (default) or Left side of the box.
Content Options
- Remove URL — Toggle on to exclude the post/page URL from the tweet text.
- Remove Username — Toggle on to exclude the
via @usernamefrom the tweet. - Hide Hashtags — Toggle on to visually hide hashtags in the display box (they still appear in the shared tweet).
Using the Shortcode
Add Click to X/Twitter boxes anywhere in your content with the shortcode:
[sharemypost_click_to_tweet tweet="Your tweet text here"]Style Customization
Make sharemypost your own with comprehensive style customization options.
Basic Styling (Free)
- Button background color
- Icon or label display
- Original brand colors or a custom color for all buttons
- Icon position (above, below, both)
Advanced Styling Pro
- Button shapes: Square, Rounded, pill, Circle, Drop
- Button styles: Filled, Outline, Minimal
- Spacing between icon and label
- Live preview of style changes
Google Analytics Integration
Easily track your social sharing performance by connecting your Google Analytics 4 (GA4) property to sharemypost.
Step 1: Get your Measurement ID
- Sign in to your Google Analytics account. If you are already signed in to your Google account, you can proceed directly to the dashboard.
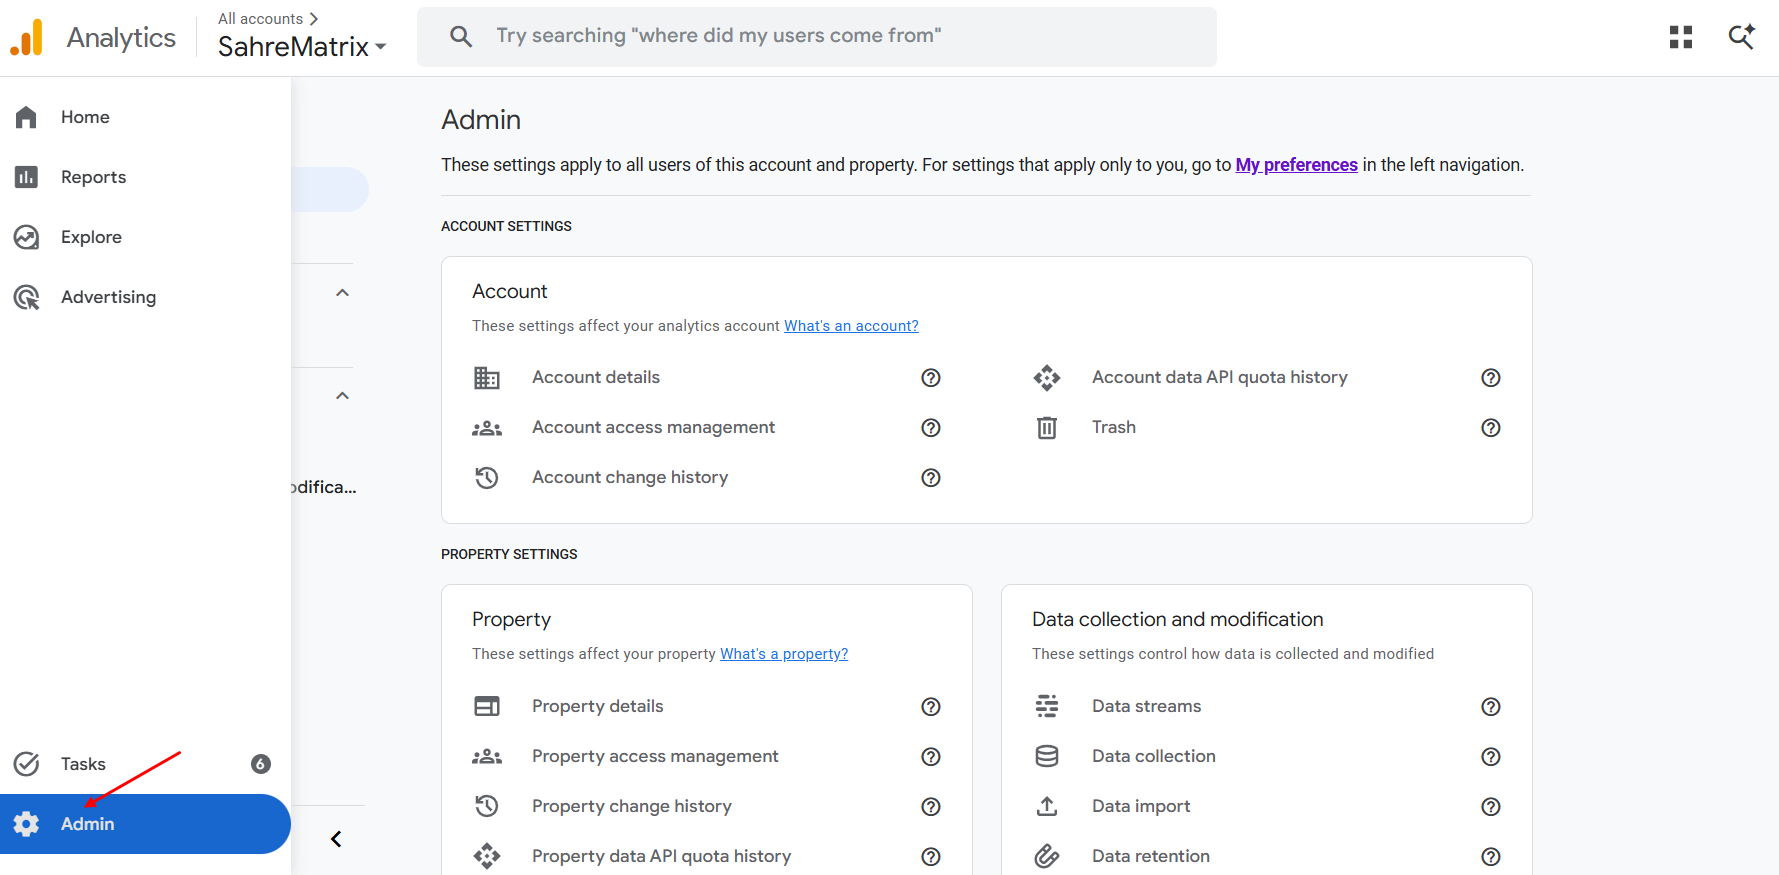
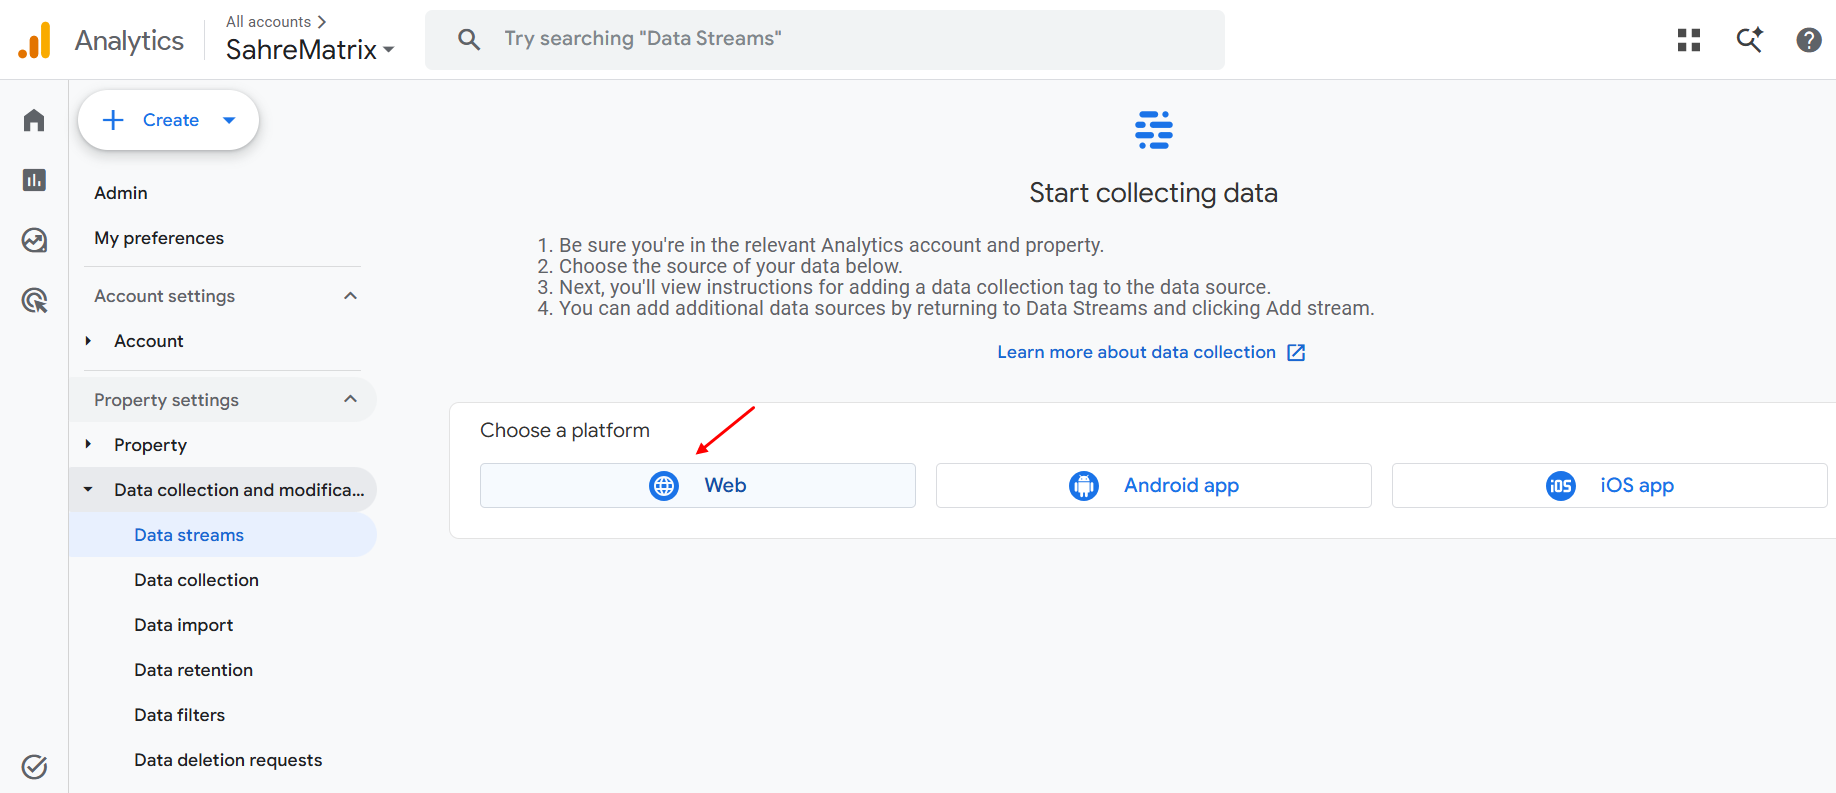
- Access the Admin panel. Navigate to the Admin section by clicking the gear icon located in the bottom-left corner of the sidebar.
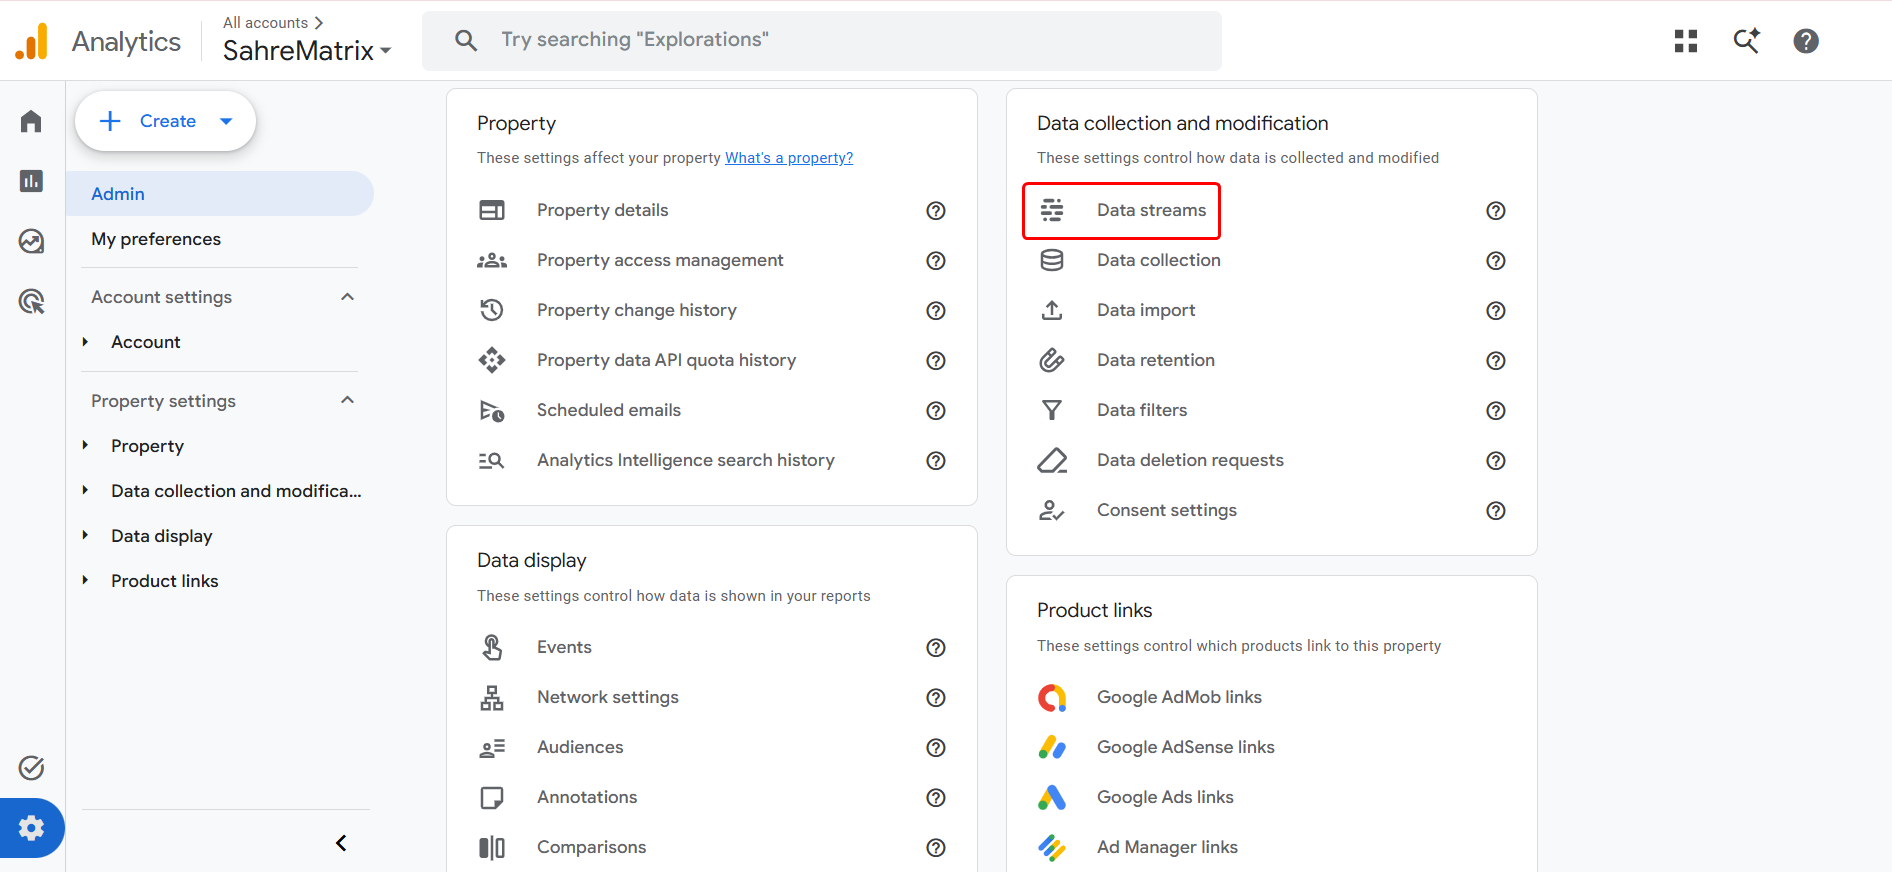
- Navigate to Data Streams. Under the Data collection and modification header, click on the Data streams menu option to view your configured website streams.
- If you have an existing stream: Click on your website's data stream from the list to open its configuration details.
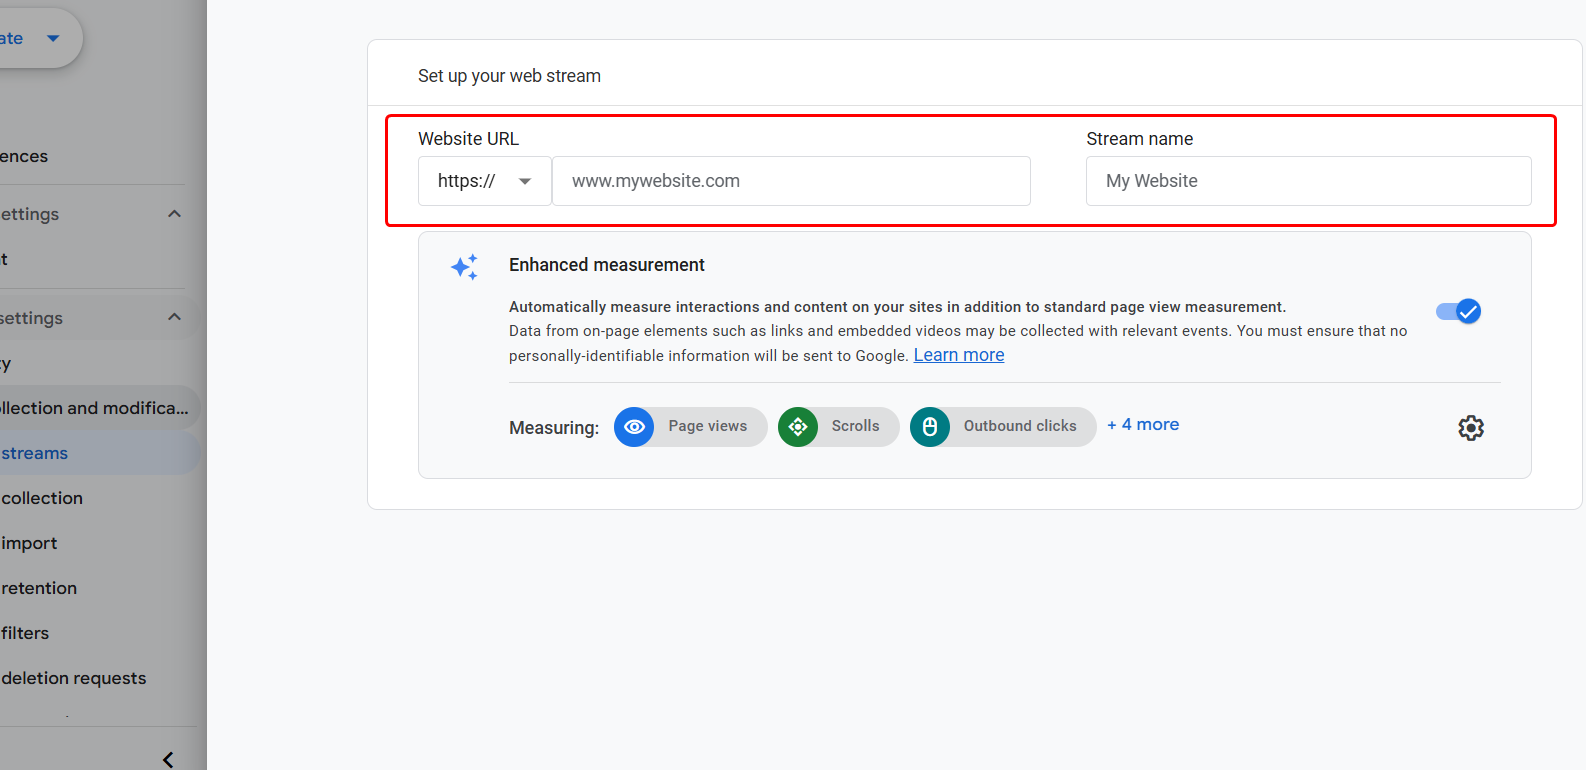
- If you need a new one: Click the Add stream button and select Web.
- Enter your website details: Input your website URL and stream name, then click Create stream.
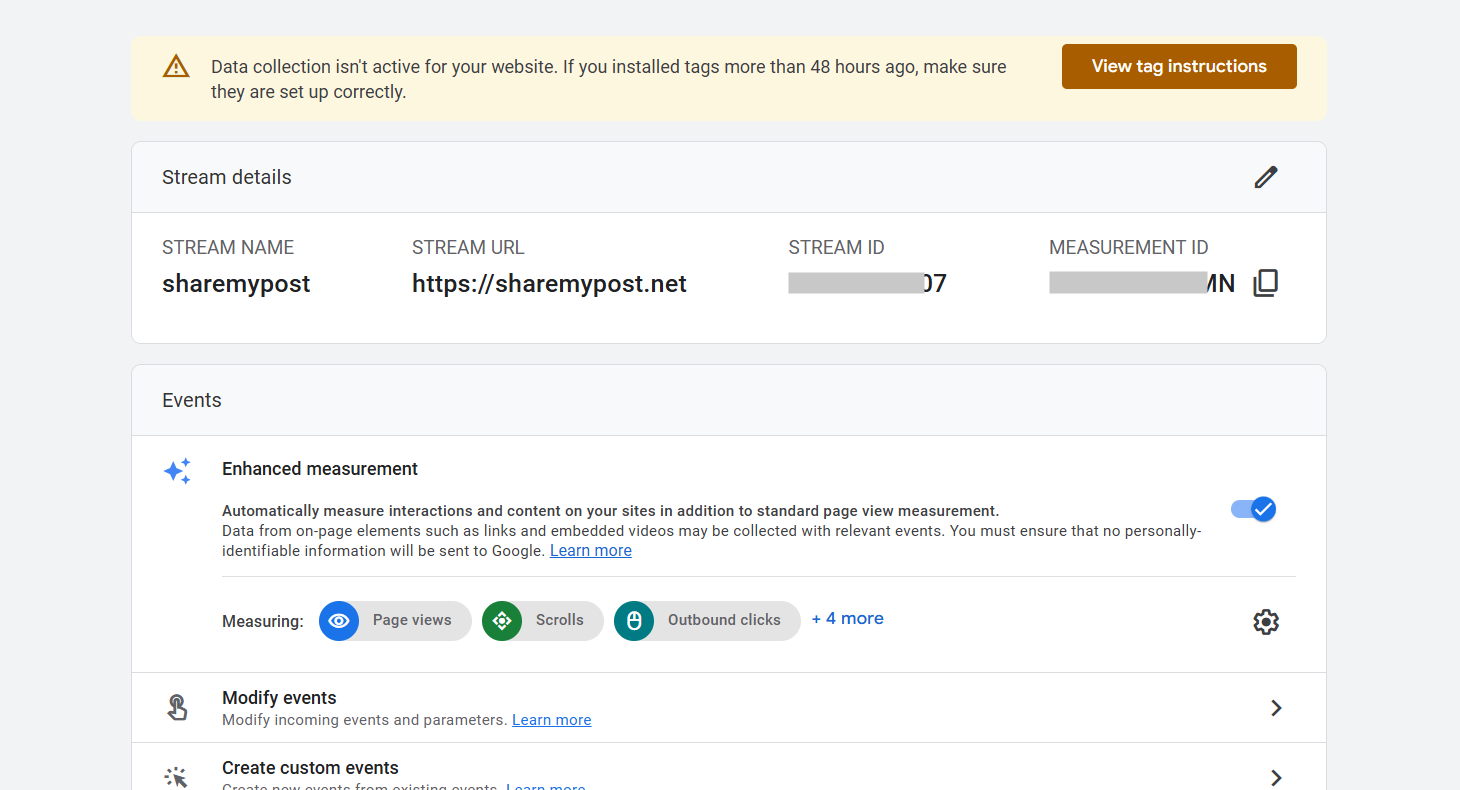
- Retrieve your ID. Once the stream details page is open, look for the Measurement ID displayed in the top-right corner of the stream details box (it will follow the format G-XXXXXXXXXX).
- Copy the ID. Click the Copy icon located immediately next to your Measurement ID to ensure it is correctly copied to your clipboard.

Step 2: Add to sharemypost
- Open the sharemypost plugin.
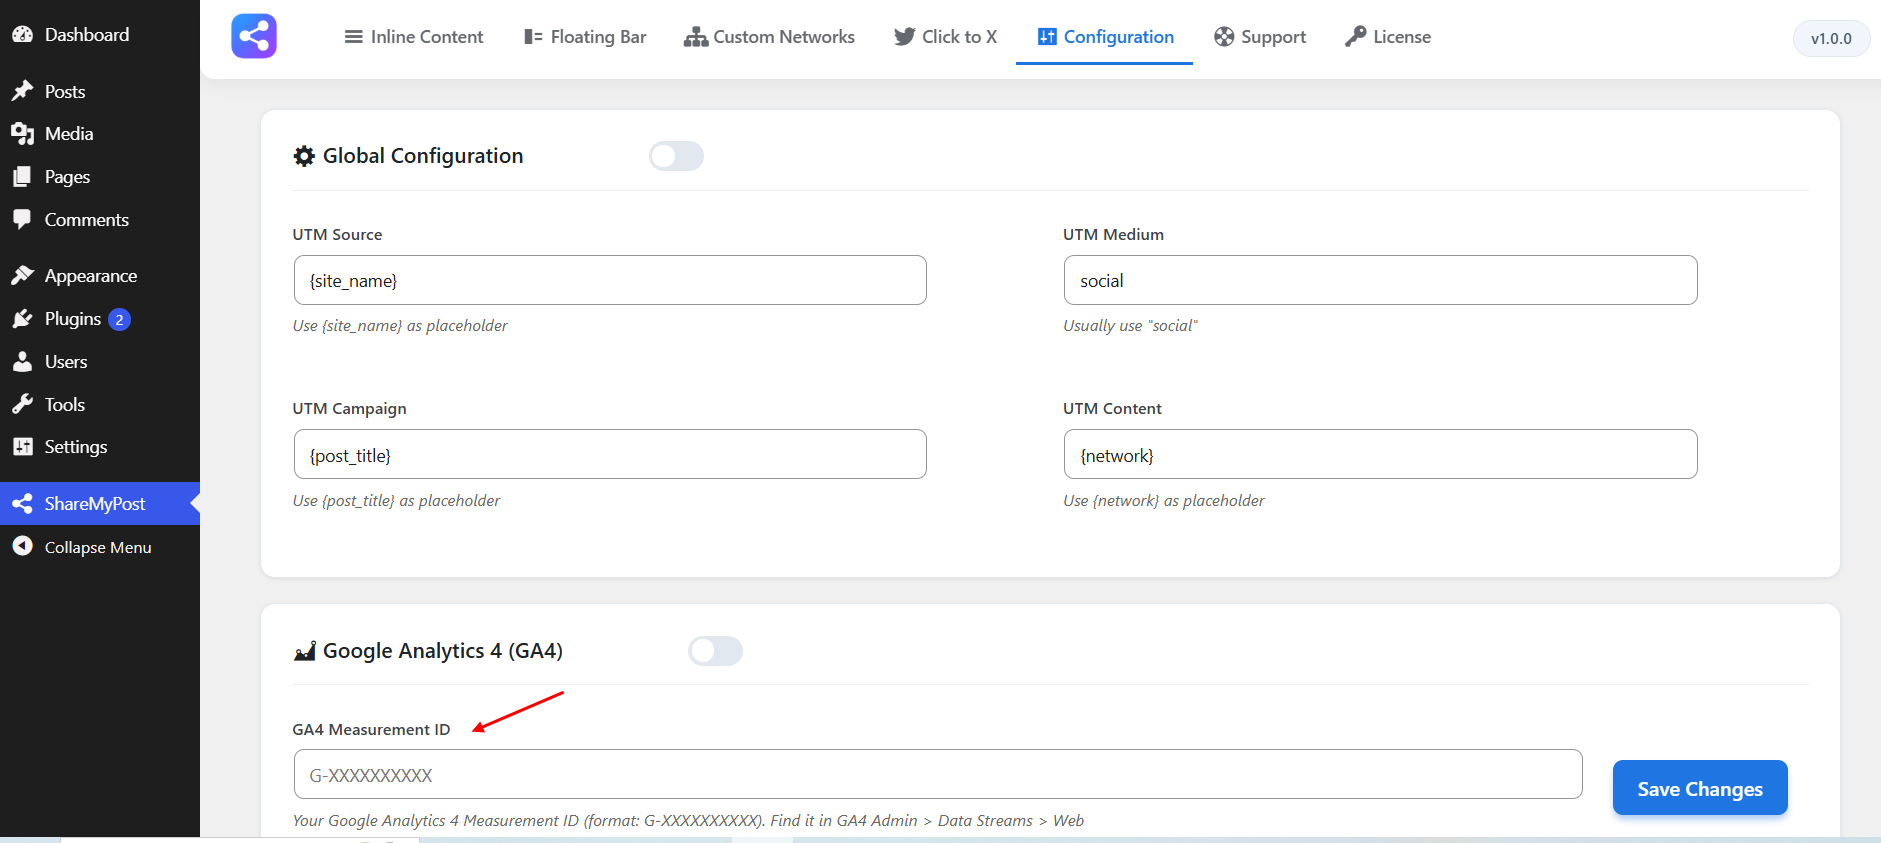
- Navigate to the Configuration tab.
- Locate the Google Analytics section and toggle the Enable Google Analytics (GA4) switch to "On".
- Paste your copied Measurement ID (G-XXXXXXXXXX) into the GA4 Measurement ID field.
- Click Save Changes at the bottom of the page.
Frequently Asked Questions
sharemypost is designed to work with any WordPress theme that properly includes wp_head() and wp_footer(). It uses clean CSS that won't conflict with most theme styles.
The free version can be used on unlimited sites, but it includes limited customization options. Pro licenses are per-site — check pricing here.
Yes. In the sharemypost settings, you can drag and drop networks to reorder them.